On Monday I shared with you my My Crush album that I am using to document my family's DisneyWorld trip from earlier this year. Today I am going to post pictures of the the other My Crush albums and give you some ideas on how to use them.
Here is the one I have My Crush Bluebird (Z1856). This one is perfect for gender neutral things as well as everyday life. I LOVE mine and am having so much fun playing with it! My sister got this one and used it as a baby album.
This is My Crush Modville (Z1855). The inside of this book is so fun and modern. I would use this as a baby album as well, or I think it would make a fun vacation book, or a fun school themed book.
This is the My Crush In the Pink Book (Z2000) and I think this would be perfect for a girl themed book (baby or growing up years) or a beautiful teen/tween book.
This is the one of my favorite of the new My Crush books, mostly because I see it as my new Christmas book that I can just keep adding to year after year and it makes scrapbooking all those fun Christmas memories really easy. This is the Holiday Happenings My Crush book (Z2098).
This is the last of the My Crush books and is the Wildwood book (Z2001). I think this one would be perfect for the outdoors person or family. Perfect for all the hiking and camping my families does. This would also make a great every day book or a fun vacation themed book as well.
Each of the My Crush books also has themed assortments that compliment and can add dimension and fun to each of the pages. These are also a great value and you get a lot for your money. I will post more pictures tomorrow to show how I am using some flip flaps in my My Crush to show how fun and easy this product is to add to your albums.
Wednesday, October 22, 2014
Tuesday, October 21, 2014
Tool Tuesday
You now have your basic tools and your adhesive and you are ready to get started scrapbooking. Let's start adding some embellishments and titles that you have stamped. So let's talk stamping supplies.
If you are using My Acrylix stamps from Close to My Heart or anybody else you are going to need some clear blocks. Close to My Heart has a great little starter kit that comes with three blocks: a 2x2, a 3x3 and a 2x3 1/2.
These are the three blocks that I use the most. I also use a 1x1 block (Y1000) and a 1x3 1/2 block (Y1002). Another thing that you will need to get if you are stamping is a really good cleaner and stamp scrubber. Close to My Heart has a great cleaner and scrubber and I LOVE them. The cleaner comes in two ways, the first is a Spritz Cleaner (1778) and then you can get the refill for the Spritz (1779). The Scrubber (Z1782) is also handy and a must have so that you can wash your stamps. I have heard some people say that they use baby wipes, not a very good idea because of the different chemicals that they put on them. The chemicals can react to your acylix stamps and eat away at them, or weaken them, or shrink them etc. So a very bad idea. You can use just water if you would like, but the staining is going to be a bit more and it takes forever.
You are also going to need some inks or stamp pads. There are a couple of different kinds so we will tackle those next week. You are also going to need some stamps, those are totally personal preference, but I would highly recommend the Close to My Heart My Acrylix stamps for a couple of reasons. 1. They are thick, which means you will not tear them while you are trying to get them off of the clear plastic sheet that comes with them for storage. 2. They are easy to use. I can see through them, so I can see where I am trying to stamp, can't do that with a rubber stamp. 3. Close to My Heart has so many and they have a range of styles. You are bound to find at least one that you like, if not 20 :) 4. They are a great value. The most expensive stamps are the alphabets and they are only $29.95. Most come with an Upper case and a Lower case, so it is like getting two sets at that price. LOVE!
Hopefully this series is helpful and you are finding out what you are going to need to start scrapbooking or cardmaking. On a side note, Close to My Heart has run out of the Chevron Ribbon that they were giving out for FREE with every $50 order, so they are now giving away a FREE trim and it will be a surprise, so place your order today and see what fun comes in your box! Just click here. Let me know if you have any questions!
If you are using My Acrylix stamps from Close to My Heart or anybody else you are going to need some clear blocks. Close to My Heart has a great little starter kit that comes with three blocks: a 2x2, a 3x3 and a 2x3 1/2.
These are the three blocks that I use the most. I also use a 1x1 block (Y1000) and a 1x3 1/2 block (Y1002). Another thing that you will need to get if you are stamping is a really good cleaner and stamp scrubber. Close to My Heart has a great cleaner and scrubber and I LOVE them. The cleaner comes in two ways, the first is a Spritz Cleaner (1778) and then you can get the refill for the Spritz (1779). The Scrubber (Z1782) is also handy and a must have so that you can wash your stamps. I have heard some people say that they use baby wipes, not a very good idea because of the different chemicals that they put on them. The chemicals can react to your acylix stamps and eat away at them, or weaken them, or shrink them etc. So a very bad idea. You can use just water if you would like, but the staining is going to be a bit more and it takes forever.
You are also going to need some inks or stamp pads. There are a couple of different kinds so we will tackle those next week. You are also going to need some stamps, those are totally personal preference, but I would highly recommend the Close to My Heart My Acrylix stamps for a couple of reasons. 1. They are thick, which means you will not tear them while you are trying to get them off of the clear plastic sheet that comes with them for storage. 2. They are easy to use. I can see through them, so I can see where I am trying to stamp, can't do that with a rubber stamp. 3. Close to My Heart has so many and they have a range of styles. You are bound to find at least one that you like, if not 20 :) 4. They are a great value. The most expensive stamps are the alphabets and they are only $29.95. Most come with an Upper case and a Lower case, so it is like getting two sets at that price. LOVE!
Hopefully this series is helpful and you are finding out what you are going to need to start scrapbooking or cardmaking. On a side note, Close to My Heart has run out of the Chevron Ribbon that they were giving out for FREE with every $50 order, so they are now giving away a FREE trim and it will be a surprise, so place your order today and see what fun comes in your box! Just click here. Let me know if you have any questions!
Monday, October 20, 2014
My Crush Album meets DisneyWorld
I have had the Bluebird My Crush Album (Z1856) for awhile just waiting for me to decide what I want to put into it. This weekend I finally looked at the stack of photos from my families DisneyWorld trip and was a little overwhelmed, so I thought-MY CRUSH! So far it is working out really nicely and I am loving it. I am also using the My Crush Memories Assortment (Z1888) and the My Crush Favorites Assortment (Z1889). I am also planning on using some of the Small Assortment Flip Flaps to help get some of my photos on the page in a different and fun way. So if you have a stack of photos that all go together (a year, an event, college days, high school days etc) grab a My Crush and start preserving your memories in a fun and fast and simple way. I will be talking more about the My Crush on What's New Wednesday so check back to see more photos and to learn more!
To get your My Crush today just visit my website today.
Friday, October 17, 2014
Favorite Friday
Today I want to share one of the reasons I joined Close to My Heart. Six years ago I was visiting with my aunt and she introduced me to the Close to My Heart How-to book Cherish (9038).
I was blown away and ordered one the next day. That year for Christmas my siblings and I decided to give my parents scrapbooks of their lives together. This was a huge undertaking, but because of this book and the help of my sister we were able to put it all together in a month. It was then that I decided to become a consultant and get the rest of the how-to books.
Reflections (9037) came in my consultant kit and I will say that it is the hardest for me to use. Mostly because it has so many options. Every layout in the Reflections book is a one-page layout that has a list of which other layouts will compliment them. This is really nice if I am in a very decisive mood, but if I am not, man it takes me forever to figure out which two layouts I want to do. So I ordered the other scrapbooking how-to book Imagine (9039).
I have gotten a lot of use out of this book. Cherish, Imagine, Magic, and the two Make It From Your Hearts are books that have two page layouts in them. They are kind of like sketches only better because they have diagrams that help you to figure out how many papers you need, what size to cut them, the best way to cut them so that you don't waste paper, and the sketches give you some dimensions (like place piece A 1 inch from the top and 1/2 inch from the left). They also are shown in a small version at the beginning and tells you how many photos you can fit in the layout. WAAAAY better than sketches in my opinion because I don't have to use my time to figure out how big or small to cut a piece of paper, or how many papers do I need to make the layout. The hard thinking is all done for me and all I have to do is figure out what papers I am going to use and where I am going to put them. I can literally put together some layouts in an 1 if I don't use too many embellishments, and that is huge for me. I don't have a ton of scrapbooking time, so I have to be able to sit down and get it done and these books are amazing in helping with that.
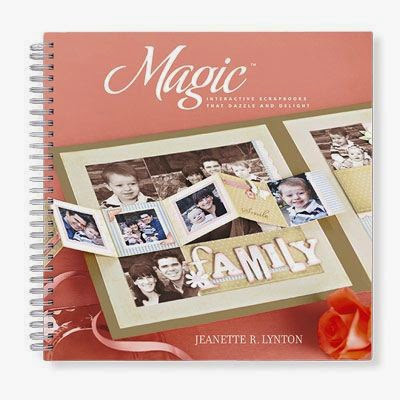
Magic (9040) is a really fun how-to book because it shows you how to make your layouts interactive. I love this book because it has taught me how to hide things, or add more than what you can see. Sometimes I want to scrapbook the event but I don't really want everyone seeing all 12 pictures, with Magic I have learned how to hide at least 6 of those photos and have a beautiful layout that is fun to look at and play with.
The Make It From Your Heart series is a little different because the books are smaller and they don't have as many layouts. They also contain card sketches as well, which is really nice. I LOVE the modern feel of these layouts. I also LOVE the price, $7.95! That is half the cost of the other how-to books and I turn to these two the most.
If you are wanting to order your own how-to books and see what they can do for you, just click here. Happy Weekend everyone!
Thursday, October 16, 2014
A Thank-you card
I have 15 piano students and 6 of them have started in the last 8 months and have all comes rom the recommendation from one family. I have been feeling so grateful for this family and wanted to give them a little something to say thank-you. I decided on a gift certificate to a fun little pizza place in town. Well I of course needed a thank-you card and did it have one in my stash that was big enough to hold the gift certificate. I decided to make one and use some of the Scaredy Cat paper again. This paper is not just for Halloween projects and layouts. Here it is in a beautiful thank-you card.
I also used some Thistle cardstock, as well as some black glitter paper. I used a piece of colonial white for my base and for the area where I stamped my sentiment.
I used black ink to ink all my pieces and thistle ink to stamp Thanks. I also used black to stamp my flowers, which I colored using the ShinHan Twin touch markers. I used lavender do the darker purple and peony purple for the lighter color. I used the 3-D foam tape to give the middle flower some dimension and used Purple glitter gems to add a little sparkle to the flowers. I love how this cars turned out and m super excited to give it away!
Wednesday, October 15, 2014
What's New Wednesday
This week for What's New Wednesday I wanted to talk about the Picture My Life product line. It is one of my new favorite products lines that Close to My Heart has put out. I use it to help get me current and up on my scrapbooking. I also use it to put my pictures that are harder to scrapbook, either I don't have enough photos for a layout, or the photos aren't very good. I also love that I can use it to show our everyday life without having to scrapbook everything. I have the Skylark Picture My Life Kit (Z1947) that I use for those everyday pictures.
I also have the Surf's Up kit (Z1946) that I use for camping, and vacations.
These kits are great because they come with 44 – 4" × 6" Cards (2 each of 22 designs), 78 – 3" × 4" Cards (3 each of 26 designs), 1 – 12" × 12" Designed Cover Sheet, and 10 – 12" × 12" Memory Protectors™ (various designs). They basically come with everything you need to get your photos out of the boxes and into your albums and still give you a fun creative way to capture your memories. I also LOVE the price. Each kit is only $24.95, which is a huge value.
If you are interested in getting one of these kits, but you want to be able to see a picture of every single card that you will be getting just stop on over at a fellow consultant's blog. To see more than just the Avonlea kit you can scroll down on her page and on the left side she has a list of the kits and each name is a link to the page with all the pictures.
If you are ready to purchase a kit today just click here. Thanks and have a great day!
I also have the Surf's Up kit (Z1946) that I use for camping, and vacations.
These kits are great because they come with 44 – 4" × 6" Cards (2 each of 22 designs), 78 – 3" × 4" Cards (3 each of 26 designs), 1 – 12" × 12" Designed Cover Sheet, and 10 – 12" × 12" Memory Protectors™ (various designs). They basically come with everything you need to get your photos out of the boxes and into your albums and still give you a fun creative way to capture your memories. I also LOVE the price. Each kit is only $24.95, which is a huge value.
If you are interested in getting one of these kits, but you want to be able to see a picture of every single card that you will be getting just stop on over at a fellow consultant's blog. To see more than just the Avonlea kit you can scroll down on her page and on the left side she has a list of the kits and each name is a link to the page with all the pictures.
If you are ready to purchase a kit today just click here. Thanks and have a great day!
Labels:
CTMH,
How to,
Picture my Life,
Pocket Scrapbooking
Tuesday, October 14, 2014
Adhesives
Last week for Tool Tuesday we talked about what basic supplies you need to start scrapbooking, what we didn't talk about was adhesives. So today we will tackle that topic and I will share what adhesives I use and love. I will also share where to get these adhesives for the best price.
Adhesives are really important in scrapbooking. You want something that will hope your pages together, something that is acid free and meant for archiving your memories. I also like adhesive that is easy to use (yes there is some out there that are hard to use!) Sometimes you will also want an adhesive that will give your layouts a little pop. I use three different adhesives every time I scrapbook. I use an ATG adhesive gun, glue dots and 3-D Foam Tape. Occasionally I will use a spray adhesive to help with really little things that are hard to get traditional glue onto.
I LOVE my ATG gun. It took me a really long time to decide to get one, but when I started going through 2-3 tombows in a day I knew that I needed something different. I got my gun on Amazon (click here). I get the refills for it on Tape Jungle. This adhesive is one that I use to glue most all of my photos and papers to my layouts. This is my go to adhesive.
I also use Glue dots a ton! I sell them through Close to My Heart (1772), but I do NOT recommend you get it from me. I know I just told you to not buy something from me, crazy I know. You can get these cheaper at any craft store, and most craft stores allow you to use a 40% off coupon as well. I use these to adhere ribbon and other embellishments. These are also great for smaller papers or things that you have stamped and are hard to use the tape gun on.
The last adhesive that I wanted to talk about is the 3-D Foam Tape. I use this one on almost every layout. It allows to me to add some dimension, to make my embellishments or my stamped images pop off the page. It is also really great and easy to use when I want to "hide" things behind other things. To do this I just put some of the 3-D tape on three of the sides. That way I can slide something, either journaling or another photo, behind an element on my layout, usually a photo . You can get other adhesives to do the same thing, but it is usually more expensive and not as easy to use, or it comes pre-cut which doesn't allow you to use it the way you might want to. The other thing that I love about Close to My Heart's is that it comes with two thicknesses, a skinny roll and a fat roll. It really makes it perfect for everything.
I hope this has helped to better understand adhesives and how to use them and what the best deals are. Let me know if you have any questions!
Adhesives are really important in scrapbooking. You want something that will hope your pages together, something that is acid free and meant for archiving your memories. I also like adhesive that is easy to use (yes there is some out there that are hard to use!) Sometimes you will also want an adhesive that will give your layouts a little pop. I use three different adhesives every time I scrapbook. I use an ATG adhesive gun, glue dots and 3-D Foam Tape. Occasionally I will use a spray adhesive to help with really little things that are hard to get traditional glue onto.
I LOVE my ATG gun. It took me a really long time to decide to get one, but when I started going through 2-3 tombows in a day I knew that I needed something different. I got my gun on Amazon (click here). I get the refills for it on Tape Jungle. This adhesive is one that I use to glue most all of my photos and papers to my layouts. This is my go to adhesive.
I also use Glue dots a ton! I sell them through Close to My Heart (1772), but I do NOT recommend you get it from me. I know I just told you to not buy something from me, crazy I know. You can get these cheaper at any craft store, and most craft stores allow you to use a 40% off coupon as well. I use these to adhere ribbon and other embellishments. These are also great for smaller papers or things that you have stamped and are hard to use the tape gun on.
The last adhesive that I wanted to talk about is the 3-D Foam Tape. I use this one on almost every layout. It allows to me to add some dimension, to make my embellishments or my stamped images pop off the page. It is also really great and easy to use when I want to "hide" things behind other things. To do this I just put some of the 3-D tape on three of the sides. That way I can slide something, either journaling or another photo, behind an element on my layout, usually a photo . You can get other adhesives to do the same thing, but it is usually more expensive and not as easy to use, or it comes pre-cut which doesn't allow you to use it the way you might want to. The other thing that I love about Close to My Heart's is that it comes with two thicknesses, a skinny roll and a fat roll. It really makes it perfect for everything.
I hope this has helped to better understand adhesives and how to use them and what the best deals are. Let me know if you have any questions!
Labels:
Adhesives,
CTMH,
How to,
Scrapbooking,
Tools
Subscribe to:
Posts (Atom)


