Monday, February 7, 2011

February Stamp of the Month Continued

Okay so last week I shared a home decor item using the stamp of the month for February and today I am sharing a two page layout using the same stamp set. And here it is:


And a close up of page 1:


And of page 2:


Here is a close up of the journaling spot, where I used a sentiment stamp from this month's Stamp of the Month:


And how close up of the hearts on page 2:


So to make this layout I used the following:
Juniper Cardstock
Cocoa cardstock
Polka dot paper from the Perfect Day Level 2 paper pack (which is $5 on my website right now and While Supplies Last so HURRY and get yours before they are gone!)
Cocoa Stamp pad
Tulip Stamp Pad
Juniper Stamp Pad
A Game stamp set for the little hearts
Love Language stamp set (you can use the Word Puzzle Soul Mates)
Chocolate Alphabet Stamp set
Sofia Workshop on the Go stamp set (for the flourishes on the journaling spot)
Magic for the layout

I hope you are loving this stamp set as much as I am! It really is easy to use to make your own background papers. All I did was stamp the image in a line. I made sure to go off the edges (patterned paper does that). To order yours today you can go to my website and while your there don't forget to check out the While Supplies Last section for some AMAZING deals, like the ribbon organizer for $5 (YUP $5!!!)

Friday, February 4, 2011

Valentine Re-Vamp

So I decided to join my friend Wendy in a Valentine re-vamp party. This is where Wendy sent everyone who signed up a questionare and we all filled it out. Then Wendy randomly assigned people partners. Next step, make something Valentine related for our new friend. Well my new friend, Lasca (love the name!), said that she loves brown and pink for Valentine's day. I thought back to two years ago when Close to My Heart had this really pretty brown and pink themed Valentine paper. I had a few scraps left and remembered this awesome project a fellow consultant did. So here it is a Valentine re-vamped!


The sad part for all of you is that the paper is retired and no longer sold, but you can still do the project using cardstock and some patterned paper. Also I had a friend cut out the letters and the hearts with their cricut and I forgot to ask the font and such, so sorry! If you have questions on how to do this project let me know, I would love to do a tutorial if there is enough people who want to know how to make one!

I also decided to send a few handmade valentines using the Sweetheart paper pack, a pattern from CTMH's how-to book, Wishes, the new stamp set A Game and a few stamps borrowed from December's stamp of the month and of course the spray pen. Here it is:


I hope you all enjoy!

Thursday, February 3, 2011

February Stamp of the Month

Happy February everyone! If you haven't checked out the NEW Idea Book just go to my website using the button on the right. There are a ton of new and fun things! I have been having a blast with it thus far and am so excited to keep creating with such wonderful products!


One of my favorite stamp sets is the February Stamp of the Month. It is wonderful for backgrounds when you need an elegant feel. I have done a few projects with it and thought that I would share them with you. Today I will share my new bathroom decorations.


Here is the center piece of my wall art (sorry you have to turn your head to make it right side up!). I used a 12x12 petal cardstock to make the paper rose. I used a White Daisy cardstock, black stamp pad and the February stamp of the month to create the background. For the butterflies I used a Juniper stamp pad and January's stamp of the month.


I also added a little sparkle to the butterflies with a bonding glue pen and some prisma glitter.


My walls are pretty bare and I knew that they needed a little something more, so I decided to use some blank canvas I had laying around. I used two 8x10. I painted them white and then mixed some white paint, Create-a-shade Pearl paint and some Juniper re-inker (so that the butterflies matched the ones I stamped earlier) and a stencil from Walmart.


I am really excited about how these all turned out!

Saturday, January 29, 2011

Blog makeover?

I am in need of a blog makeover and I really hope that I win one from visualserendipity.com!

Friday, January 28, 2011

Close to My Heart New Product Blog Hop!

I am so excited about all the new products coming out in the next month (February 1st!). You can always see the Idea Books online, but if you would like one to hold and love they are FREE from me with a $25 purchase, or for signing up for one of my clubs (I guess I should put the schedule up huh?) or for attending my Open House (which is TBA!). Or you can just buy one from me, just email me and we will get everything figured out. Now onto the artwork!

Here is a layout I made following the Magicians Choice in the Magic How-to Book (9034):


Next we have a close up of each page:


The title is Field Trip and uses the Bohemian Alphabet (E1019) and blush ink (Z2106) and in the picture it looks a little unreadable, but in real life it reads well.


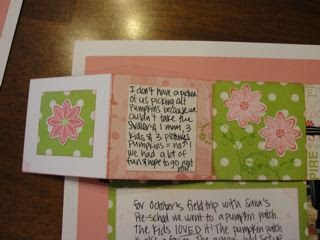
So for the middle 3x3 square on the top I made a little book to hold some more pictures and journaling. The front of the book was made by following the Middle Ground pattern for a 3x3 card found in the How-to Book Wishes (9033). The black ribbon used to keep it closed is from the black mini medley (Z1393). Here is what the inside looks like:


Ta Da! I love it! So the paper is the Sophia Level 2 paper pack (X7131B) and the stamp set is from the Sophia Workshop on the Go (G1019) (So if you want to recreate this layout, just buy the Workshop on the Go it comes with the paper and the buttons and waxy flax that I used to!). The buttons are from the Pink assortment (Z1370) and I threaded Colonial White waxy flax (Z1081) through them. I used Blush (Z2106), Pear (Z2197) and Hollyhock (Z2128) stamp pads for the stamping.

I LOVE how this layout turned out and I hope you do too! Now go check out the other awesome work done by fellow consultants!


I also linked here:
Craft Goodies

Wednesday, January 26, 2011

Sweetheart Love

So here is a little sneak peak at the papers in the Sweetheart collection that will be available for purchase February 1st, but I just couldn't resist! So I am part of a craft group that meets monthly and this month we were "suppose" to make a frame out of molding with a burlap background and a monogram letter. Well I wasn't feeling so well (the sick has been going around lately) so I picked up my supplies and headed home. Then while looking at my Sweetheart paper and watching a video online from a fellow Close to My Heart consultant, Tracey Mason, a light bulb lite up above my head and the following was born:


Isn't it beautiful! I LOVE it! It makes me smile every time I walk by it. So instead of using the molding from craft night, I went ahead and set that aside for a different project, same with the burlap and the wood backing. I did however use the letter monogram! The pink polka dotted paper is from the Sweetheart level 2 paper pack (X7134B), so is the striped paper that is covering the "L". I used a tulip stamp pad (Z2166) and the Bohemian stamp set (E1019) (don't forget that you can get this at a discount this month, check out this post for details!) to stamp the phrase "Love is Spoken Here." The frame is just a random frame that has been sitting in my house for way to long with nothing in it. Also if you don't have a wooden letter, you could always use the dimensional elements monograms (L is Z1066).


Like mentioned above I used Tracey Mason's paper flower technique to make the paper flowers. I used Tulip and Cotton Candy cardstock which came in the Sweetheart level 2 paper pack. The leaves for the flowers are from a retired product, but you could always use the leaves from the Miracle Dimensional elements (Z1354) or stamp some from a variety of stamp sets Close to My Heart has to offer. I used Sweet Leaf for the green and edged the leaves with black. To glue all the paper parts to the cardboard (yes cardboard) backing, I used Close to My Heart's Liquid Glass (Z679). For the letter (since it is wood) I used some E6000 to keep it in place though liquid glass might have been enough (but hey with three kids and 6 hands running around, I wasn't taking any chances!)


And there you have it! A fun Valentine's day project using some fun techniques and some beautiful paper!

I linked this post to: Type A
and to:
Craft Goodies

Friday, January 21, 2011

Wings Banner


So I thought that I would post some pictures of a banner I made using Close to My Heart's banner (Z1378), paper from the Wings Level 2 paper pack (X7135B) and the Bohemian Alphabet (E1019). I also used the stamp set from the Wings Workshop on the Go and the spray pen. The banner comes with 8 white chipboard pennants, I just cut one and layered it on top of another. I followed the instructions that came with my purchase of the Wings Workshop on the Go and the banner. I was thinking of doing something else, but this was way cuter! I hope you enjoy!