Friday, January 30, 2015

Cricut Challenge

Challenge 11 in Super Stashbusters was to use a machine to cut things for the layout.  I used my Cricut Expressions 2 and the Artbooking cartridge for my layout.  I am thinking of doing this challenge again because it is so fun and the Artbooking cartridge has so many overlays to play with. I went with a hexagon pattern and use an old stamp set to add some color and pattern to my layout.


I loved our first home, it was perfect for us and sometimes I wish we still lived there, though I think all six of us would not fit as nicely as the three of us did.
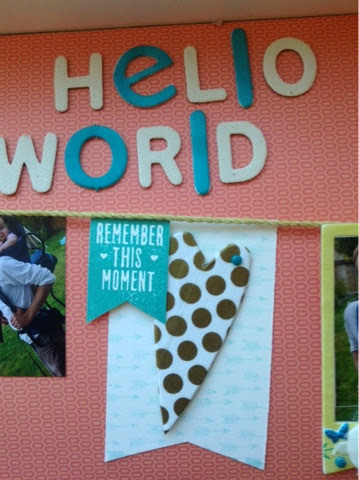
Products used:

Wanderful X7191B
White Daisy Cardstock

Black Ink Z2109
Honey Ink Z2162
Crystal Blue Z2117
Smoothie Z2196
Gypsy Ink Z2190

Junebug Puffies Z3038
Silver Trim Z1799

Artbooking Cartridge Z1906

Everything listed above is available on my website at sharesa.ctmh.com


Thursday, January 29, 2015

Punches

Challenge 10 in Super Stashbusters was hard for me because I do not have a lot of punches.  The challenge was to let the punches speak, well I have two a corner rounder and a heart.  So I used the corner rounder to make scallop borders and I used the heart to make umm... hearts.  Crazy I know.


My youngest was crazy and was crawling by 4 months and this layout is all about that.  It is kind of nice because I didn't need a ton of journaling to finish the layout.  

Products used:

Hopscotch Paper X7194B
Colonial White Cardstock

Silver Shimmer Trim !799
Junebug Puffies Z3038

Handwritten Print Alphabet E1030

Black Ink Z2105
Smoothie Ink Z2196


Wednesday, January 28, 2015

Vintage inspired

So the next challenge in Super Stashbusters was to use something that is vintage inspired. I do not have much that is vintage inspired, in fact I have nothing.  So another take on it was to do an older photo. So I dug through my old photos and found three that worked with the sketch.


I decided to use some of my Skylark Picture My Life cards for the background as well as the journaling and accents.  All the rest of the product I used is retired, sorry!


Speaking of retired/retiring here is a long list of retiring stamps.  These stamp retire on Saturday so get them while you can!

A1124 A Tree
A1139 Congrats Graduate
A1141 Be Still
A1154 Friendly Thoughts
A1156 Flower Confetti
B1418 Love Doily
B1423 Hoppy Easter
B1439 Dreamer
B1440 Fancy Fair
B1441 Buggy Love
B1444 Greatest Love
B1445 Happy Hive
B1450 Owls
C1571 You're the Best
C1573 Do Your Best
C1574 Believe in Yourself
C1577 Mother's Day
C1579 Coming Up Roses
C1583 Robot Family
D1547 Paper Doll
D1579 Windy Day
M1035 Newlyweds
M1036 Perfect Polka-Dot Day
M1037 Balloons
M1038 Shooting Star
M1039 Good Job Stencil
M1040 Parasol
M1041 Hi
M1042 Colored Egg

You can get these on the retiring section of my website.  You can also get the Skylark Picture my Life cards there as well.


Monday, January 26, 2015

Super Stashbusters old and new

Challenge 8 in Super Stashbusters was to use some of your oldest stuff with your newest stuff.  I dug around and found some fun metal embellishments that I got close to the beginning of my journey with Close to my Heart almost six years ago.  I have been having so much fun playing with the Hopscotch paper and it is really new to me so I picked that as my new thing.  I also wanted to play with the January stamp of the month so I pulled that out as well. Here is what I ended up with:


I have decided that I love to mix and match things!  One of the reasons I started with Close to my Heart was because everything coordinated which made my scrapbooking easier and faster, but I am loving that I can mix and match and stil create fun and beautiful layouts in a matter of minutes.  

Products used and available on my website:

Smoothie ink Z2196

Warm clay ShinHan marker

Colonial white cardstock 
Hopscotch paper X7194B

Teal shimmer trim Z1918
Aqua dots Z1853
Hopscotch assortment Z3016
Tags Z1684

This moment January stamp of the month S1501


Friday, January 23, 2015

Hopscotch layout #2


I decided to create the second layout using the Hopscotch workshop on the go.  I ended up rotating the pages to work with horizontal photos (apparently I live horizontally since most of my photos are horizontal).  So once again, make the sketch or the guides work for you, they are made to make your scrapbooking faster, simpler and easier.


Products used:

Hopscotch workshop on the go G1091
Flaxen ink Z2642
Glacier ink Z2641
Slate ink Z2173
Smoothie ink Z2196
Cricut artbooking collection Z1906
Marcy journaling pen Z1979

All of the above are available on my website at sharesa.ctmh.com


Thursday, January 22, 2015

Hopscotch workshop on the go

I love the new Hopscotch paper and thought that the workshop on the go was a lot of fun.  There were a few things that I didn't like and I felt it was all a little busy, so I changed it to something that I loved. To do this I didn't do all of the cricut cutting and I moved the journaling as well.  So if you get a workshop on the go and you just aren't feeling every little detail it is okay to change it and make it work for you.


A couple of tips for this workshop:

Spray glue works wonders on Cricut cuts, such as the photo mats that needed colonial white strips and the photos adhered before glueing to the layout.

To get the pinwheel look the easiest thing to do is to put them all on the block and then turn your stamp sheet over and hold your block over the pinwheel shape and adjust your stamps till you get the shape you are looking for.

Use tape on the back of your layout to hold the twine.

Products used:

Hopscotch workshop on the go G1091
Flaxen ink Z2642
Glacier ink Z2641
Slate ink Z2173
Smoothie ink Z2196
Cricut artbooking collection Z1906
Marcy journaling pen Z1979

You can get all of the above at my website: Sharesa.ctmh.com


Wednesday, January 21, 2015

Sparkle bonus challenge

One of the bonus challenges for Super Stashbusters was to use sparkle or metallic on a layout. I love sparkles!  Close to my Heart has so many fun ways to add sparkle to your layouts.  Glitter paper, glitter trim, glitter embellishments like the Junebug Puffies, sparkles, glitter dots etc.  I decided to use some pink glitter paper that I have had for awhile but haven't used very much of.  Here is the final product:


Don't you just love the glitter paper?  This layout was so easy to put together and used up a bunch of old paper and scraps.


I ended up doing the journaling along the edge of the paper because I didn't want to cover up any more of my glitter and I wasn't a huge fan of where the journaling was on the sketch.  The joy of being creative is making things your own and hat is what I did with the sketch and this layout.

Products used and still available:

Colonial white cardstock 
Glitter paper pink Z1922
Flamingo dots Z1934
Clay ShinHan marker

Sharesa.ctmh.com

Tomorrow I am hoping to share a workshop in the go layout so stay tuned!


Tuesday, January 20, 2015

Ombré in scrapbooking

There are so many fun ways to add the ombré effect to your scrapbooking pages.  You can use paper, watercolor pencils, ink, misting etc. to give your background or embellishments a fun and trendy look.  Challenge 6 in Super Stashbusters was to use the ombré on a layout in some way. I opted to follow the sketch and used paper in my background to create the ombré.  I found that I didn't have a ton of patterned paper that would go together and create the look I was going for, so I had to use some background stamps to add some visual interest to my plain old cardstock.

Here is the final result:


Products used:

Flaxen ink Z2642
Desert sand ink Z2118
Bamboo ink Z2103
Cocoa ink Z2114
Glacier ink Z2641

Clay ShinHan maker
Peacock green ShinHan marker

White daisy cardstock
Desert sand cardstock
Bamboo cardstock 
Cocoa cardstock
Glacier cardstock 
Hopscotch paper X7149B

D1540 in the background 
E1030 handwritten 
A1150 charming chevrons 
C1618 Year>>Noted (only available this month for $5 with a $50 purchase on my website)
Stamp from the hopscotch scrapbooking workshop on the go

Junebug puffies Z3038
Teal shimmer trim Z1918
Tags Z1684
Aqua dots Z1853

All of the above is available on my website at Sharesa.ctmh.com


Friday, January 16, 2015

Challenges

Nothing like a two for one right? I had two challenges this week (one from super Stashbusters and a CTMH one) and I decided to combine them into one layout. Here is the finished layout:


I wanted a layout that I could hang in my house to show our goals for 2015.  (Challenge from CTMH).  I followed the sketch from Super Stashbusters challenge numer 7 (yes I skipped challenge six and will come back to it later).  I used the paper from the Year>>noted paper (January National Papercrafting Special), along with the gold foil stickers and stamp set. I love this list and am so excited that it only cost me $5 with a $50 purchase. 

Here are a few close ups:


See those white dots? Those are the reduce, reuse, recycle part of the challenge from Super Stashbusters and are pieces of paper from my three ring hole punch.  I am loving this layout. I love that is has all our goals and a picture that shows how old we all are when these goals were made.  It uses our word for the year and is a pretty reminder of what we are striving for this year.

Products used:

Desert Sand cardstock 1273 or in cardstock combo Basics X5933
Year >>Noted paper 

Flaxen ink Z2642
Glacier ink Z2641

Light orange ShinHan marker
Clay ShinHan marker

Art Philosophy Cricut cartridge Z1686
Artbooking Cricut cartridge Z1906

Tags dimensional elements Z1684

Teal Shimmer Trim Z1918
Auqa Dots Z1853

All of the above are available on my website (Sharesa.ctmh.com)

Happy Friday!


Wednesday, January 14, 2015

Stamping technique

Challenge five for Super Stashbusters was to use a stamping technique. I choose to do some second generation stamping (ink stamp then stamp on scrap paper before stamping on desired piece of paper).  I used a stamp that I had never used but bought because I loved it, guess what I still love it and I am going to try and use it more often (S1304 My Sunshine).  Here is the final layout and some close ups:


The above photo shows the second generation stamping technique. I stamped the outside of the sun with first generation, and the inside is the second generation using the same color ink.

This layout took a turn when I started adding the embellishments.  I was planning on blue and black as my accents and just having the su be the bright yellow, but I found that I really like the contrast of the yellow which then lead to adding the purple accents because it went so well and added depth and more interesting contrast.  So don't be afraid of following the process and trusting yourself.

Products used:

Golden Yellow ShinHan marker
Lavender ShinHan marker

Silver shimmer trim Z1799
Purple glitter gems Z1936
Black arrow washi tape Z2003
Tags dimensional elements Z1684

Gypsy ink Z2190
Black ink Z2105
Honey ink Z2162

Colonial white cardstock 1388
Crystal blue cardstock 1292 or in the whimsy cardstock combo X5940
Black cardstock 1386 or in the basic cardstock combo pack X5933
Patterned paper from the Wanderful paper pack X7191B

Artiste Cricut cartridge Z1790

Handwritten Print Alphabet E1030

The above list is available on my website, Sharesa.ctmh.com.

Color scheme that makes me happy

Challenge 4 in Super Stashbusters was to make a layout using a color scheme that makes you happy as well as coordinates. I love our new color Glacier and decided to look to Close to My Hearts color wheel to find some others colors that would work together. I came up with Smokey Plum and Pacifica.  Keeping it to three colors helped me to not go crazy and to keep the layout simple.  I also had to follow a sketch and I am learning that I really like following sketches and growing in my creativity.  


 Also with this layout I used all my deep blue buttons and finished a package of triangle studs. I also got out some background stamps that I hadn't used in a while.  I am only going to list the supplies I used that are still available on my website (Sharesa.ctmh.com).

In the background Flair D1540

Glacier ink Z2641
Pacifica ink Z2192

Purple glitter gems Z1936
Triangle studs Z1928

Marine blue ShinHan marker

Smokey Plum cardstock 1291 or as part of a combo pack X5934
Colonial white cardstock 1388


Tuesday, January 13, 2015

Altered embellishment

The bonus challenge in super Stashbusters week one was to follow a sketch and alter an embellishment.  Here is my final layout:


Here are some close ups:


This next picture shows a few embellishments that I altered. I colored the chipboard letters using the peacock green alcohol marker.  I also used some gold polka dotted washi tape to change the heart dimensional element.  For the banner chipped I used the pastel green ShinHan marker to give a little more color and to help them pop.


Products used:

Lagoon ink Z2195
Flaxen ink Z2642

Flight of the arrows D1578
This Moment ($5 with a $50 purchase) S1501
Year Noted (part of the National Papercrafting special this month)

Flaxen extra thick twine Z3036
Junebug Puffies Z3038

Snapshots dimensional elements Z1901
Teal shimmer trim Z1918
Gold dotted washi tape Z1920
Aqua dots Z1853

Paper is from the Hopscotch paperback X7194B

I am not listing the retired products, sorry!
Everything listed is available on my website: Sharesa.ctmh.com


Monday, January 12, 2015

Repeating design

The third challenge in my Super Stashbusters class was a layout with a repeating design.  The sketch had washi tape as the repeating design and I loved it so I followed the sketch and got this as my final layout:


I used a bunch of different CTMH washi tape (some expired), some glimmer trim, and a hostess reward stamp from the last idea book that had a bunch of fun washi tape designs. I used a bunch of expired embellishments to add a few fun touches. I also used stay on ink to stamp the arrows on to the washi tape. The arrows and the journaling spot came from the Chalk It Up workshop on the go stamp set.  I am loving having scrapbooking challenges that use my stash and push me to try new things.  Today I am going to work on a challenge to alter an embellishment or I might try doing a layout on my New Year's Resolutions sponsored by CTMH. To find information on this challenge you will need to visit the Close to my Heart Facebook page or Instagram page.


Friday, January 9, 2015

Grid design

The second challenge in Super Stashbusters was to use a grid design on a layout. Once again I had a sketch to work with and since I enjoyed the "fly by the seat of your pants" scrapbooking from the last challenge I thought I would try it again. I couldn't do it! I tried I really did, but after cutting one picture I knew I needed to map it out. So here was my plan: 


I knew I wanted to use the rest of my burlap ribbon and some brown  and colonial white ribbon, so I measured those out and followed the sketch. The sketch had three rows with five boxes in each row. I knew my pictures would need to be small in order to fit them all in.  I started with this map above and then cut everything out and played around with it.  Here is my finished layout:


I ended up changing a few things from my original map and the sketch but I am loving it!   I used a ton of retired product (burlap ribbon, brown and colonial white ribbon, skylark assortment, colonial white rosette ribbon, and the pin clips).  Talk about stash busting!  I used two skylark picture my life cards for the title and journaling.  Next up is repeating an element on a layout. Super excited about trying this challenge!


Thursday, January 8, 2015

Retiring Stamps

The following stamp designs, last featured in the Spring/Summer 2014 idea book, are being retired. They will no longer be available to order after January 31, 2015. These sets can be viewed in the “Retiring Items” category on my website.
 
A1124 A Tree
A1139 Congrats Graduate
A1141 Be Still
A1154 Friendly Thoughts
A1156 Flower Confetti
B1418 Love Doily
B1423 Hoppy Easter
B1439 Dreamer
B1440 Fancy Fair
B1441 Buggy Love
B1444 Greatest Love
B1445 Happy Hive
B1450 Owls
C1571 You're the Best
C1573 Do Your Best
C1574 Believe in Yourself
C1577 Mother's Day
C1579 Coming Up Roses
C1583 Robot Family
D1547 Paper Doll
D1579 Windy Day
M1035 Newlyweds
M1036 Perfect Polka-Dot Day
M1037 Balloons
M1038 Shooting Star
M1039 Good Job Stencil
M1040 Parasol
M1041 Hi
M1042 Colored Egg

Wednesday, January 7, 2015

Rule of Odds

I had 45 minutes to craft yesterday so I pulled out my first challenge from the Big Picture Classes Super Stashbusters class and got to work. I am a "follow the rules and steps" kind of scrapbooker and today I tried the "fly by the seat of your pants" way and really enjoyed it. I had a sketch to follow, along with the challenge of three clusters of embellishments following the rule of odds. The Rule of Odds, according to Aly Dosdall,  "states that a visual composition is more pleasing to the eye when things are grouped in groups of odd numbers."

Here is what I came up with:


I also wanted to try out the white on white trend that I have been seeing on Pinterest.  I did not use any patterned paper and I am really liking the way this page came out. I am thinking about adding some metal brads just to try and use my stash a little more.  Let me know what you think.  This post also comes with a challenge: 

Follow the rule of odds on your next card or layout.  If you do come back and post a picture or a link to a picture.


Product used:
White daisy cardstock 
Lagoon ink Z2195
Honey ink Z2162
January stamp of the month ( arrow)
C1575 True to Life
C1521 Approved 
E1030 Handwritten Print
Honey triangles washi tape Z1933
Teal shimmer trim Z1918
Flamingo dots Z1934
Cotton candy dot washi tape retired

To get any or all of these product just go to my website.